So, you are wondering how to grow microgreens at home without soil? Maybe you just want to experiment with your growing methods or maybe getting your hands dirty in the soil is just too messy for you.
Growing microgreens indoors without soil, aka growing hydroponically, can be an excellent idea for you if you are looking to do some experimentation. If you are growing on a smaller scale then all you need are some basic equipment like seeds, growing trays, water sprays, a light system, growing medium and nutrient solution (optional).
If growing commercially, then you can use your vertical space to maximum by implementing growing racks and also automating the watering process with an automatic water pump.

In this article, we will discuss with you a step-by-step process of growing microgreens indoors hydroponically and we will also elaborate on what equipment to use and how to utilize them to their maximum potential, to have a cost-effective microgreens business.
How to Grow Microgreens at Home Without Soil?

In this section, we will discuss the equipment needed to start and what are the alternatives if you have trouble finding any of the mentioned equipment.
1. Growing Trays
The standard size of the plastic trays used by most microgreen growers is considered 10”x20”. You could either buy one which already has drainage holes in them or make some holes yourself.
2. Microgreen seeds
Seeds that have been treated with fungicides best be avoided at all costs. Moreover, it’s best to buy organic seeds, more so which are specifically bred for growing microgreens. You can read our article here on what are the healthiest microgreens to grow to make an informed decision about which seeds to buy.
3. Lights
If you are growing microgreens at home – without or with soil – you will need to invest in artificial lighting. Microgreens growers usually use T5 fluorescent lamps for their microgreens but we would say that the normal T8 lights will work just as well and are relatively cheaper.
4. Growing medium
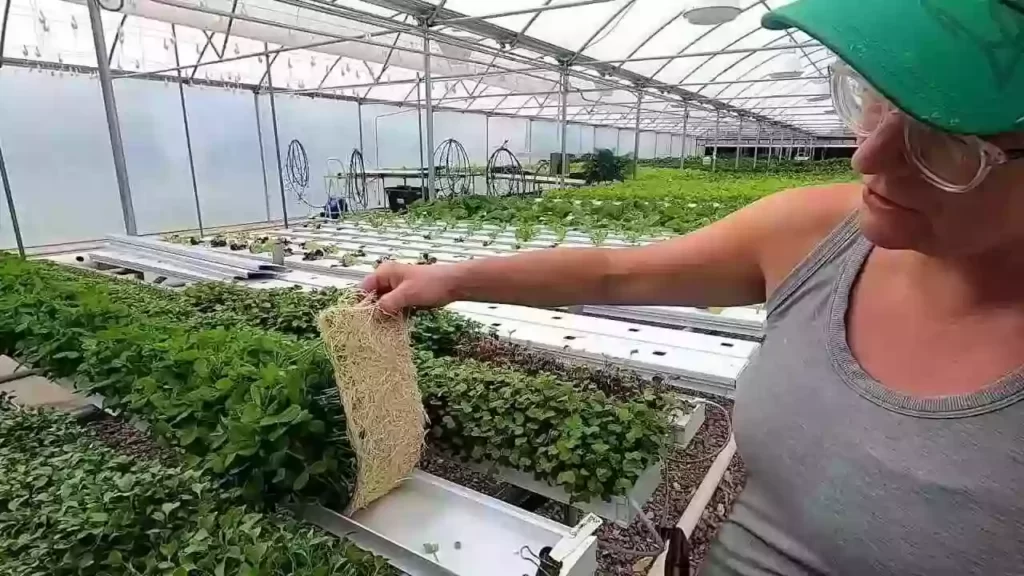
Anything from coconut coir to hemp mats can be used as a growing medium for growing your microgreens. The medium will give the microgreens support and help them stand upright so choose your medium accordingly.
5. pH test kit or strips
The pH of your water should always be checked first. The water might be in perfect pH for the growth of your microgreens but it’s always better to be safe than sorry. If the pH level is high or low, you can always make the necessary adjustments.
6. A spray bottle
You should buy a new spray bottle that is devoid of any chemical stains. Make sure that the bottle has never been in touch with any kind of chemicals that can be harmful to your microgreens, as these remnants can be really harmful to something as delicate as the microgreens.
7. Nutrients
It is ideal to buy nutrients that are organic and are specifically designed for growing microgreens hydroponically. But if that’s not available, don’t worry you can use any general hydroponic nutrients and it would be just as good!
Many people claim that microgreens get most of their nutrients from their seeds and rarely require water added with extra nutrients.
While that’s not at all wrong and microgreens can grow hydroponically simply with just water, we would like to refer you to this video where you can find out what a difference adding just a few extra nutrients to your water will do to your plants.
A Step by Step Process of Growing Microgreens at Home Without Soil

1) Preparing Your Water
Ph-balanced water of the range 5.5 to 6.5 is ideal for your microgreens so you should test and adjust your water accordingly. While wood ash and lime increase the pH of the water, phosphoric acid decreases it. Distilled or rainwater is the best.
Tap water can be used if you absolutely don’t have any other option but we’d rather recommend that you at least let it sit for about 24 hours or boil it to get rid of any or all the chlorine.
2) Soaking Up Your Grow Mat
Since you are growing microgreens at home without soil you will be needing to stimulate a healthy growing environment with the use of your grow mat. Trim your grow mat in such a manner that it fits your growing trays. Then place your grow mat in the water or nutrient solution to soak it all up before draining off all the excess water and transfer it to your 10″x 20″ growing tray.
3) Adding in the Main Component: the Seeds
Spread the seeds all over your growing tray i.e. on the growing mat in even proportion, although different seeds require a different density so we’d recommend referring to the packaging or researching a bit on your own to find the optimal density for your seeds. After you’re done with that, drizzle them lightly with your spray bottle, using a nutrient solution or just some clean water; either will do!
4) Covering Up Your Seeds
You’ll need to cover up your precious seeds with a lightproof cover and leave them in complete darkness. This can simply be done by flipping another tray upside down over your growing tray. This is known as the blackout period. This is the step where the germination of the seeds will begin.
5) Blackout Period
It’s best to keep the microgreens covered up in complete darkness while they start germinating and eventually sprouting. Open the tray only when it’s time to mist them. You should mist them about every 12 hours or so. For the first 4-5 days, keep your microgreens in complete darkness, but it mostly depends on the variety of seeds you are using so do a little self-research about the same.
6) Growth
After 4-5 days, or whatever days your plant must be kept in darkness, you’ll start to see that the microgreens have started to grow quite nicely. You should then remove the lightproof cover that you had placed over them and place the tray under fluorescent lights.
Now that they are not under a light cover, start using small quantities of water poured directly into the tray instead of misting them. The water you use could be either just Ph balanced clean water or a weak hydroponic solution, both works fine. As for the strength of the hydroponic solution, we’d recommend reducing it to 1/4th of its original strength and it’d do just fine!
7) Harvesting
Around 10 to 12 days later, most microgreens are ready to be harvested so take a sharp blade and carefully cut off the microgreens at the base of their stems. Rinse and dry your freshly harvested microgreens properly before placing them in between moist paper towels and keep them in a Ziploc bag and refrigerate until you’re ready to use your healthy, grown-at-home microgreens, that too without soil!
And you thought growing microgreens at home without soil was tough!
Which is Better: Growing Microgreens in Soil or Water?

Hydroponic growth vs. traditional soil has always been an ongoing debate when it comes to growing microgreens at home. Some plants do better in the soil while some do better in hydroponics.
Microgreens have been a hot topic in this debate for a long time since they’re harvested soon after their germination. The initial growth process is very crucial. Choosing the most appropriate growing method is the most important factor in growing a healthy batch of greens.
It’s in your best opinion to grow microgreens in soil, as opposed to hydroponics. Soil is a superior choice in this case due to several reasons, including:
- Better yields
- Sustainability
- Affordability
- Flavor
- Water conservation
- Mold prevention
- Growth resistance
- Longer shelf life
Microgreens actually do sound fancy, and they certainly add an element of class to any plate they’re served on. So, if you’re ready to grow some microgreens on your own then better stick around. We know that this article is about growing microgreens at home without soil but for the sake of comparison, we couldn’t resist this comparison and show you the benefits of both the growing methods.
Benefits of Growing Microgreens in Soil vs. Without Soil (Hydroponics)
Hydroponics is believed to make the process of tending to microgreens easier and less involved; however, that has been effectively proved to be a myth. In actuality, all of these methods are pretty similar in the amount of effort needed.
The only difference in the effort is that soil requires a more upfront effort. But when we stop to consider the maintenance part, both methods are pretty much even. When we look at things other than effort, there are quite many reasons why soil is a better alternative to grow microgreens.
Here are some of those reasons:
1. Better Yields
When you grow microgreens in soil, you are more likely to have yields that are substantially higher than when you grow them in a hydroponics way. This basically means that if you tried to grow the same amount of microgreens in soil and hydroponics, you would see a considerably higher quantity of harvested microgreens when both plants are fully developed.
According to a study published in the New Zealand Journal of Crop and Horticulture Science, some of the most popular microgreens like basil, swiss chards, and rocket microgreens showed lower yields when grown with the hydroponic method.
2. Soil Can Always be Reused
Hydroponics is said to be fully compostable, and it actually is. However, there is a catch about composability. Hydroponics is biodegradable, but if left on its own, it will take several years to start decomposing. To fully compost a hydroponic, you must be assisted with machinery and proper methods.
Soil, on the other hand, can be reused over and over and over again. You can plant more seeds immediately after you’re done harvesting a plant in the same position and it would not affect the seeds in any way.
3. Soil Is Much More Affordable
This complements the previous statement; you’ll need to buy hydroponics after each harvest but no such thing is needed with soil. In a long term, it will become more expensive than buying a few bags of soil which can be used for who knows how long!
Also, many reputable brands in the market sell affordable and healthy potting mixes to grow your microgreens. These potting mixes come with appropriate proportions of soil, perlite, and other essential nutrients that help you grow a healthy batch of microgreens with ease.
4. Soil Produces Better Tasting Plants
Those who have tasted both microgreens from hydroponics, as well as soil, can attest that microgreens grown in soil taste much better. This is likely because they come off as more natural this way. It also gives them the ability to fully mature as they were made to do in nature, and give the microgreens a more authentic taste.
These plants have always been grown naturally in soil. So sometimes, it is hard to reinvent something that will have the same taste and effectiveness as that of a natural plant.
Not just the taste, but microgreens when grown in soil or with a combination of vermicompost tend to have higher nutrient concentration when compared with the same variety grown in hydroponics. In a study, cabbage microgreens and lettuce microgreens were grown in hydroponics and vermicompost+soil methods, and the latter method produced more nutritious batches of the aforementioned microgreens.
5. Less Watering
When you plant microgreens in hydroponics, you must closely monitor them and water them at least once a day, preferably once every 12 hours. Soil, on the other hand, gives the plant the water it needs and even stores some water in saturation so that the plant remains hydrated for a long period.
With all that you must also think of the point that microgreens planted in the soil only need to be watered once every two days.
6. Hydroponics May Produce Mold
You would need to maintain a good water level when growing microgreens in hydroponics which can get tricky. Growing microgreens at home without soil requires far more water than when you grow them in soil, but at the same time, there is a risk of overwatering them. Even a small mistake can ruin your whole plant when it comes to water levels in hydroponics.
When you water the microgreens too heavily in the hydroponics, they get flooded out. Other times when moisture gets locked into the hydroponic then it has nowhere to drain out. This causes the microgreens to grow mold and become diseased and sometimes even die.
7. Not all Microgreens Grow in Hydroponics
Some microgreens are not even capable of growing when they are raised in hydroponics. Many of these plants are meant only for soil. Sunflowers and beets are some of the most notable microgreens that won’t grow in hydroponics at all. If you wish to grow either of them then the soil is your only option.
Some microgreens like wheatgrass, kale, and kohlrabi are preferred to be grown hydroponically and produce better yields than when grown in soil or share a room with others plants.
Growing Microgreens on Paper Towels/How to Grow Microgreens with Tissue Paper
If you do have the choice of growing the microgreens in soil, then you should absolutely choose that over other methods.
However, paper towels are ideal for people who live in flats or congested places and cannot properly handle growing plants in soil. In short, they are the perfect option for your beautiful, little indoor garden.
If you are inclined to know how to know to grow microgreens at home without soil, or rather more specifically, on paper towels then you must follow the right steps to receive the best yields.
Again, not all microgreens can be grown on paper towels just like in hydroponics.
For example, cabbages have deeper roots than most other microgreens thus it makes it harder to flourish in such difficult conditions. Microgreens are very convenient to grow and can be easily grown in a variety of locations but sometimes it’s not possible for all our precious greens.
That’s why growing them on paper towels is okay but not really preferred. They have an intense aromatic flavor and concentrated nutrient content, which makes your mouth water and stomach growl with happiness and hunger. As a result, they are a great addition to your salads and sandwiches and so many other healthy foods. People love their delicious flavor and vibrant colors; the nutritional value is just another plus point!
Many researchers and experts have proven that microgreens are also rich in nutrients that are vital for our bodies. They don’t just taste and look good but keep your health good as well.
Hydroponic Microgreens Growing Tips
- It is advised to maintain cooler temperatures (60° to 70° F, or 15° to 21°C) while growing microgreens, to protect them against pests or fungus. Although warmer temperatures can relatively speed up your growing process thus find the ideal temperature that works best for you and your microgreens. Make sure your microgreens get enough light which is much more important than temperature.
- If you see your microgreens beginning to rot or getting infected by fungus, throw out the entire tray along with the pad. Sterilize the tray thoroughly with a weak bleach solution, or even with vinegar as a more organic option. Be sure to rinse your tray properly, wash it twice just to be sure before you use again it for growing.
- If your batch is starting to rot, it’s either because you’ve likely overwatered them or you’ve spread your seeds much more thickly than instructed. Microgreens’ roots need plenty of oxygen, so if they’re completely submerged and you aren’t oxygenating the water using an air pump then they might die or even become victim to root diseases.
- If your plants seem to be wilting, you’ve probably under-watered them. Your grow pad should be always kept soggy and not just damp. When you grow your microgreens at home without soil (hydroponically), there should be a fine balance between under-watering and overwatering that usually takes time and experience to get perfectly right.
- Watch out for bugs in your growing trays. You would want to catch them as early as possible and remove them right away, instead of letting them develop into a much bigger problem.
- Keep your operation squeaky clean and tidy. After all, you’re growing actual food and it needs to be hygienic! You must follow basic food safety precautions like properly sterilizing your trays before use, using high-quality clean water, and being sure to wash your hands before handling your microgreens at all costs.
- Does your tray have a slight odor? That necessarily is a cause for concern. Most growing trays start to give off a mild odor, late in the growing cycle or after many uses. But at the same time, it’s something to keep an eye on as it might be a sign of mold or even fungus, but generally, it’s all good if your microgreens have a little bit of smell. Extra ventilation can help a lot with this.
- When growing a microgreen salad mix, it’s absolutely okay to sow the seeds of several different varieties of microgreens in the same tray. First, make sure that they have similar harvest times and needs or not else things might not be great.
- When you’re trying to re-grow multiple crops of microgreens from the same batch of seeds, it’s not commercially viable. Once you’ve harvested your first batch of microgreens from the growing tray, make sure to dispose of your growing medium and start afresh.
- Do optimize your lighting properly. If your crops are pale, you might require a stronger light source. But if you find your crops getting burned, then they might be getting a bit too much light. Some crops like turnips, mustard, and arugula are quite sensitive to light. For them, you’ll need to move your grow lights further away than usual, use a lower wattage, or even reduce the amount of time of exposure.
- If you find your crops to be generally weak then you might not be keeping them in the dark for an adequate amount of time. In that case, do let your crops stay in darkness for an extra day or two; it would do those loads of good. It will give them sufficient time to develop stronger roots.
Final Word
To conclude, we would recommend you to plant your microgreens in soil but if you are growing microgreens at home without soil, then just follow the instructions given in this article and you’ll be just fine!
But remember that all microgreens are not the same, so do research a bit about your seeds before planting them. We wish you healthy and tasty microgreens and some happy gardening time!


